
Iyengar Yoga Self-Practice Sequence


The ability to practise yoga alone in your own space, in your own time, at your own pace, with your own feelings and reflections, is beneficial in evolving and deepening one’s practice. Here an Iyengar practice sequence is provided that can be used to develop a self-practice routine.
Benefits of self-practice
Practising within the energy of a group in a class environment, in a dedicated yoga space, and with the direction and assistance of an experienced teacher, is necessary in the beginning, and is vital for generating the impetus, confidence and maturity to practice alone. Moreover self-practice is not something that everyone one wants to pursue. For some, life is busy, and attending classes regularly is aspiration enough! Depending on one’s circumstances, however, self-practice may be more viable for some, and perhaps seem a natural evolution from attending classes.
Practising alone allows for a level of reflection that may not be as possible to achieve within a class context. For the most part, in a class, students are guided by the teacher, both in terms of the sequence and where to direct one’s attention within the pose. Of course, this is all necessary for at least the first few years of one’s yoga journey, to become acquainted with how to do the poses with a sense of competence and what adaptations may be required for one’s individual circumstances. At some stage, however, for the practice to become a true yoga practice space is needed for the reflective (or vairagya) aspect to evolve.
Iyengar yoga and self practice
While Iyengar yoga has many positives and is the gold standard when it comes to the refinement of the poses, it does not have a set sequence that practitioners can familiarise themselves with and follow when practising alone. (BKS Iyengar does provide a 300 week course of sequences at the back of his famous book Light On Yoga, however for most people this course is not viable, both due to the length of the sequences, and the complexity of the asanas within the sequences. In his later years Iyengar even said that he should have added an extra zero to the length of the course, meaning it should probably have been a 3000 week course!) In fact, chances are when attending Iyengar yoga classes that one will never do the same sequence twice! There are many reasons for this, including BKS Iyengar’s insistence that one’s practice should not become a habit, but rather an invigorating, creative experience. Nevertheless, when starting out it can be very encouraging and useful to have a set sequence to follow.
Iyengar yoga and sequencing
While the Iyengar system may lack clear, defined sequences to follow it does have a methodical approach in terms of what types of poses are introduced, and when.
The standing poses are introduced in the beginning of a sequence. They are dynamic, and when done diligently, remove lethargy and generate energy. In the standing poses one particularly learns how to work the feet and the legs correctly. For most poses the feet and the legs form the base of the asana, and as any architect knows, a solid foundation is necessary to support a structure. In the same way an understanding of how to work the feet and engage the legs is necessary to create a solid base for the rest of the asana.
The sitting poses are introduced next, and this includes forward bends and twists. Once access to the hamstrings, hips, groins and the base of the spine has been gained from correct feet and leg action in the standing poses, the sitting poses can be worked on and accessed. In forward bends one learns to lengthen and extend the spine and spinal muscles. In twists the spinal muscles are stretched and strengthened, in preparation for the backbends. The backbends can be considered the pinnacle of the practice. They open the chest, strengthen the arms, and make the spine flexible. They are invigorating, uplifting the spirit and generating energy.
From the peak of the practice the spine and nervous system needs to be neutralised. Inversions and restorative poses can be taken to create this effect. In Iyengar yoga inversions are considered to be the backbone of the practice. They can be practised intensely or quietly, but either way they refresh the whole system. Along with restorative poses, they draw the energy generated from the more active asanas inward and bring the mind into a self-reflective state. Inversions and other restorative type poses are not simple poses, and in fact, require proficiency in the active asanas for their effectiveness to be absorbed and appreciated on a cellular level.
It is traditional for Iyengar yoga schools to teach classes in a monthly cycle, with a focus on a different category of pose each week. Standing poses are focused on in the first week of the month, sitting poses (including forward bends and twists) in the second week, backbends in the third, and restorative/ inversions/ pranayama in the fourth. Occasionally there will be a fifth week, and this is usually regarded as a miscellaneous week, where less common poses are focused on.
Self practice sequence
The sequence given below combines all the categories into the one practice. It assumes that one has been attending Iyengar yoga classes regularly (twice a week or more) for a minimum of one year, and requires about an hour to go through thoroughly. Some basic props would be useful, such as a strap, a brick, a blanket, and ideally a bolster. Adaptations can be made according to level of proficiency, time constraints, prop availability, and to provide some variation, although this one sequence can be practised over and over again as presented.
Salamba sirsasana and salamba sarvangasana have been omitted, however according to time available, can be added to the sequence. Salamba sirsasana could be taken before the standing poses (after the first two poses), after the standing poses (before the sitting poses), or toward the end after supta padangusthasana I. Factors determining this would be the time of day the practice was taken, and level of compentancy in inversions. Salamba sarvangasana would go before halasana, and if taken, halasana could be taken in the more traditional manner immediately after salamba sarvangasana. Working up to 10 minutes in each of these poses would be ideal.
Scroll to the bottom of this page for a downloadable PDF of the poses in this sequence.
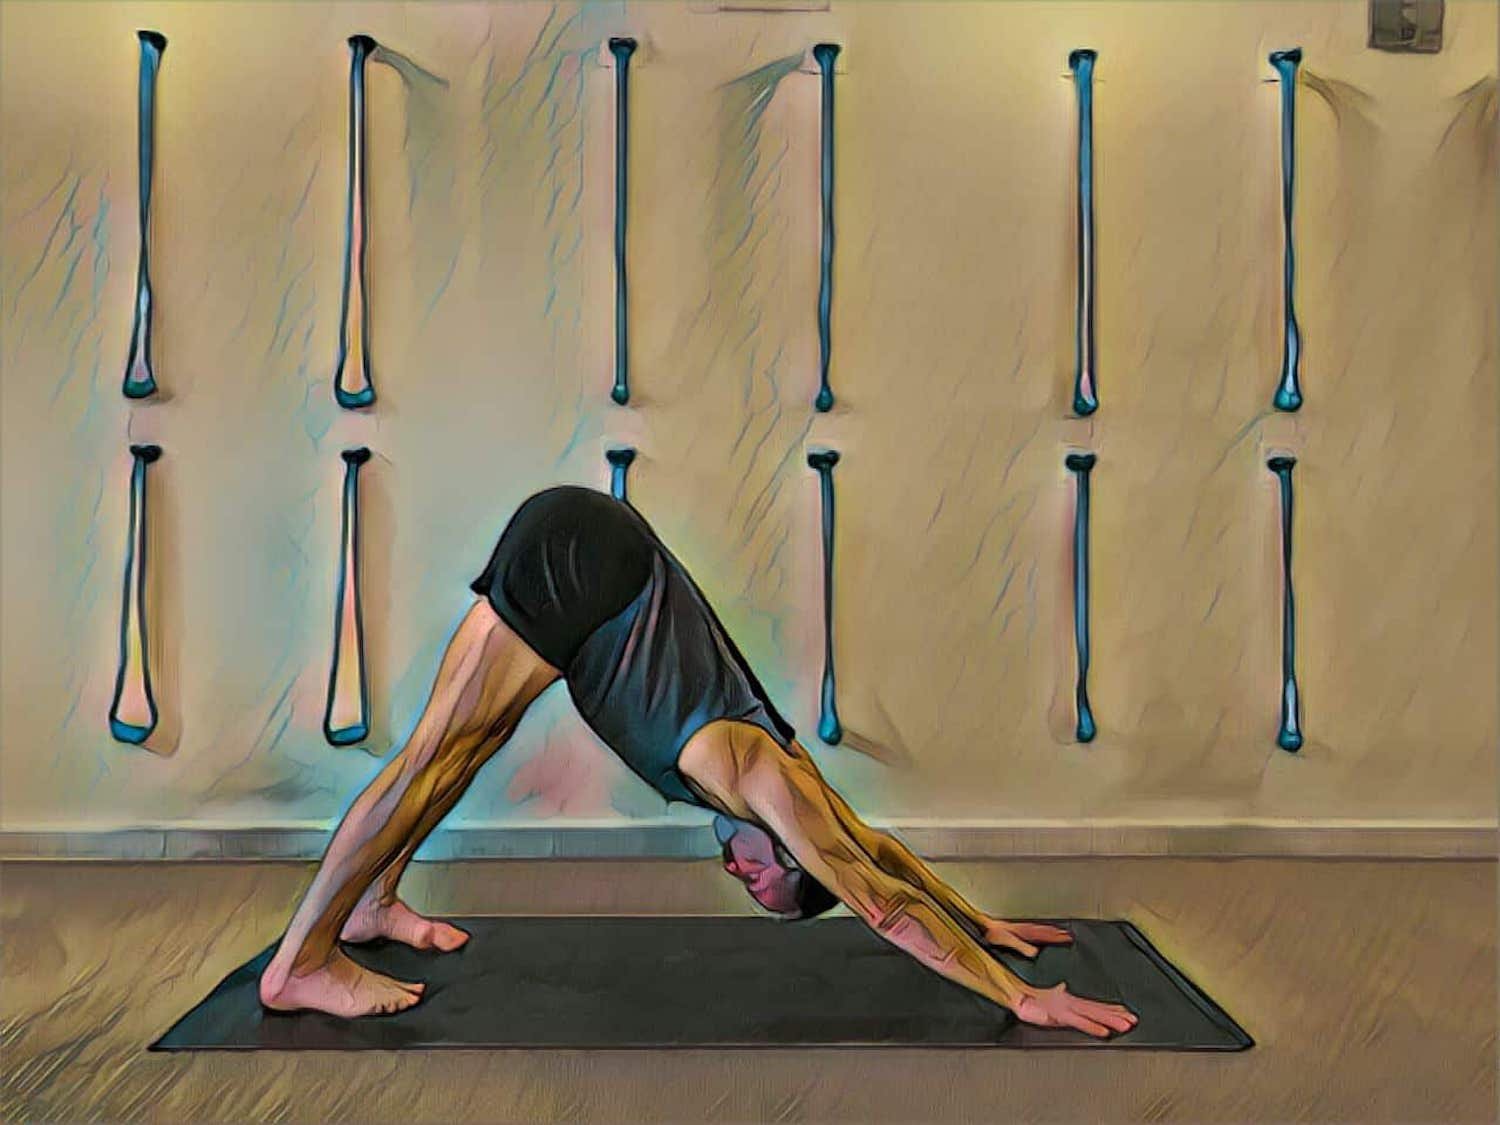
1. Adho Mukha Svanasana
Begin with this pose. It can be considered a prostration before the practice begins, as well as taking the brain from a mundane to a ‘yoga practice’ state. Repeat twice in combination with the next pose.

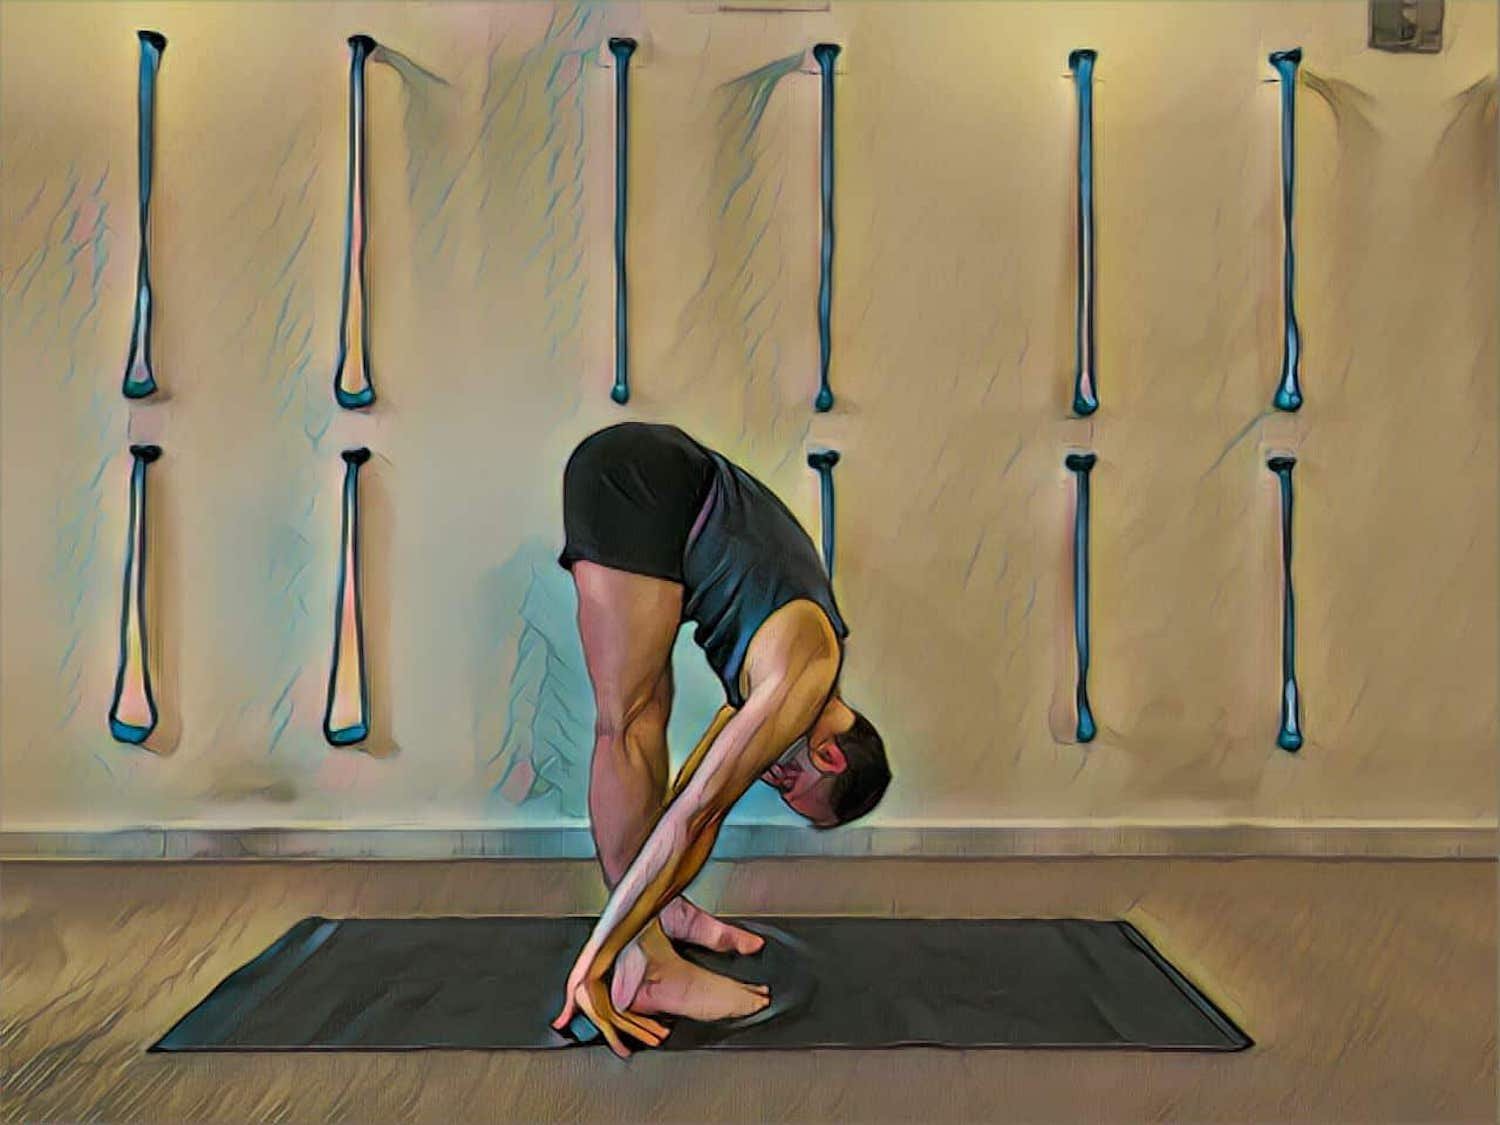
2. Uttanasana
Walk the hands back from adho mukha svanasana, keep feet hip width apart. Adho mukha svanasana prepares the arms, whereas uttanasana prepares the legs. It also has a similar effect on the brain as adho mukha svanasana. Repeat twice with adho mukha svanasana.

3. Tadasana
This is the base pose. It is a blueprint pose for all the other poses. Keep returning to tadasana between each standing pose. Look to further refine it each time you return to it, before moving to the next standing pose.
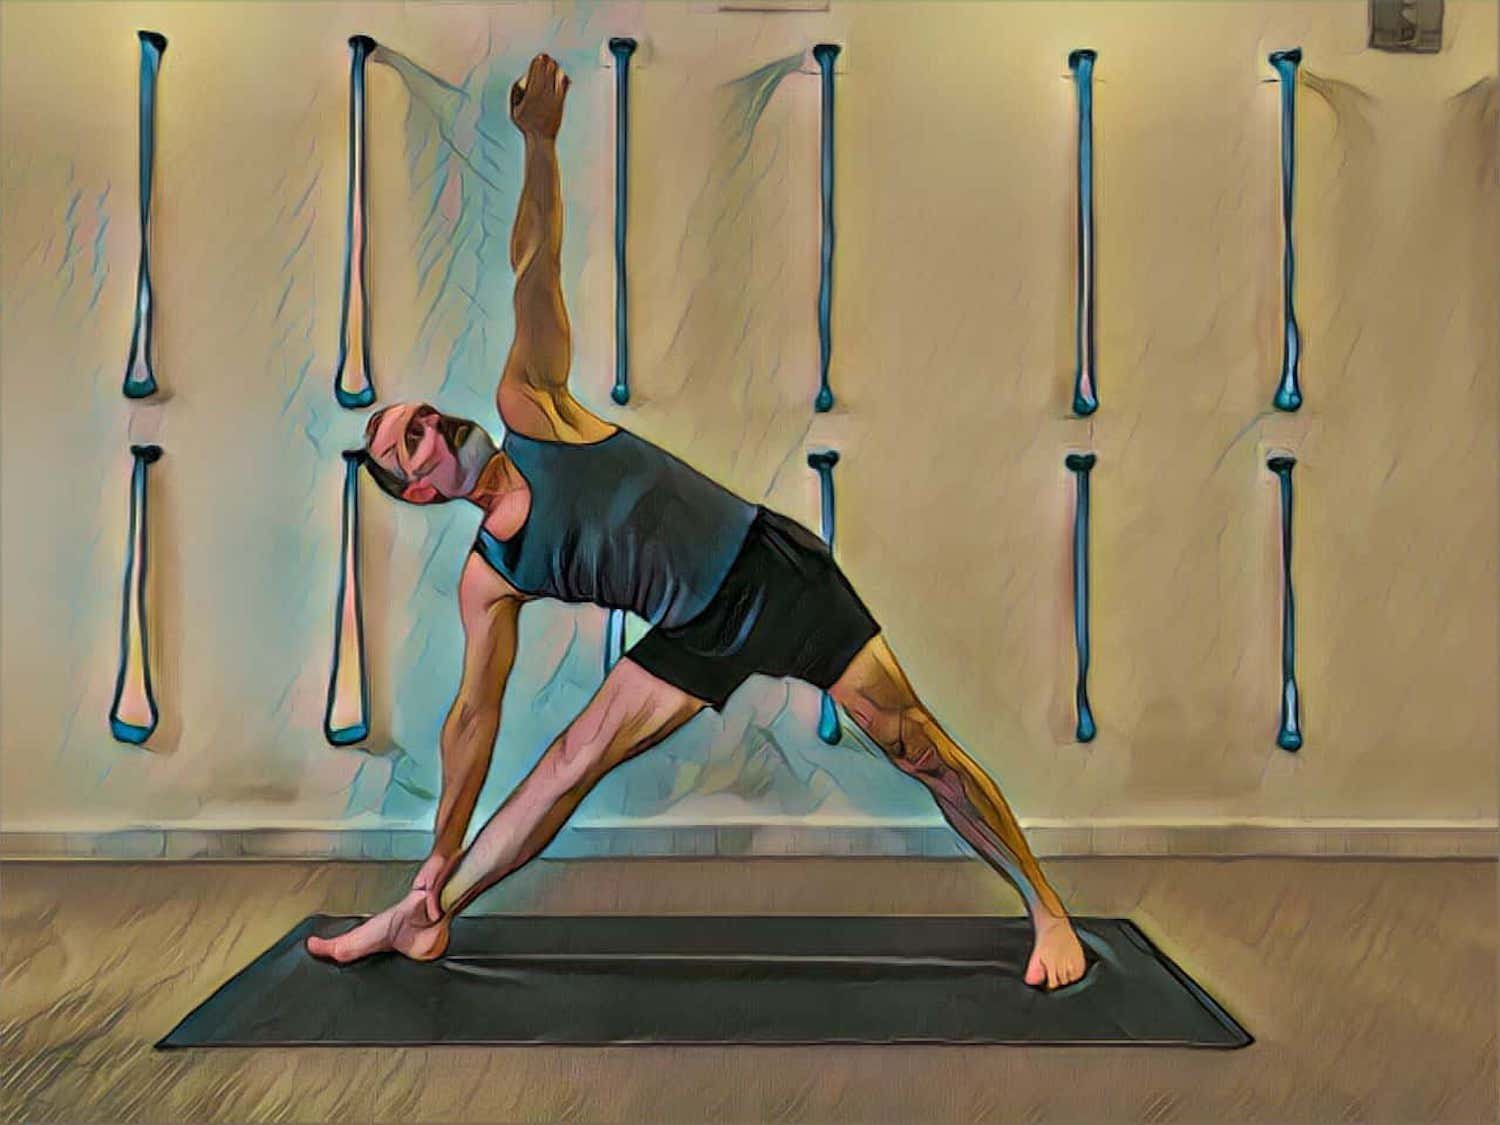
4. Trikonasana
Jump, or step, the legs apart. Turn to the right and do the pose. Come up. Turn to the left and do the pose. Come up. Jump, or step, back to tadasana. Spend 45 - 60 seconds on each side.

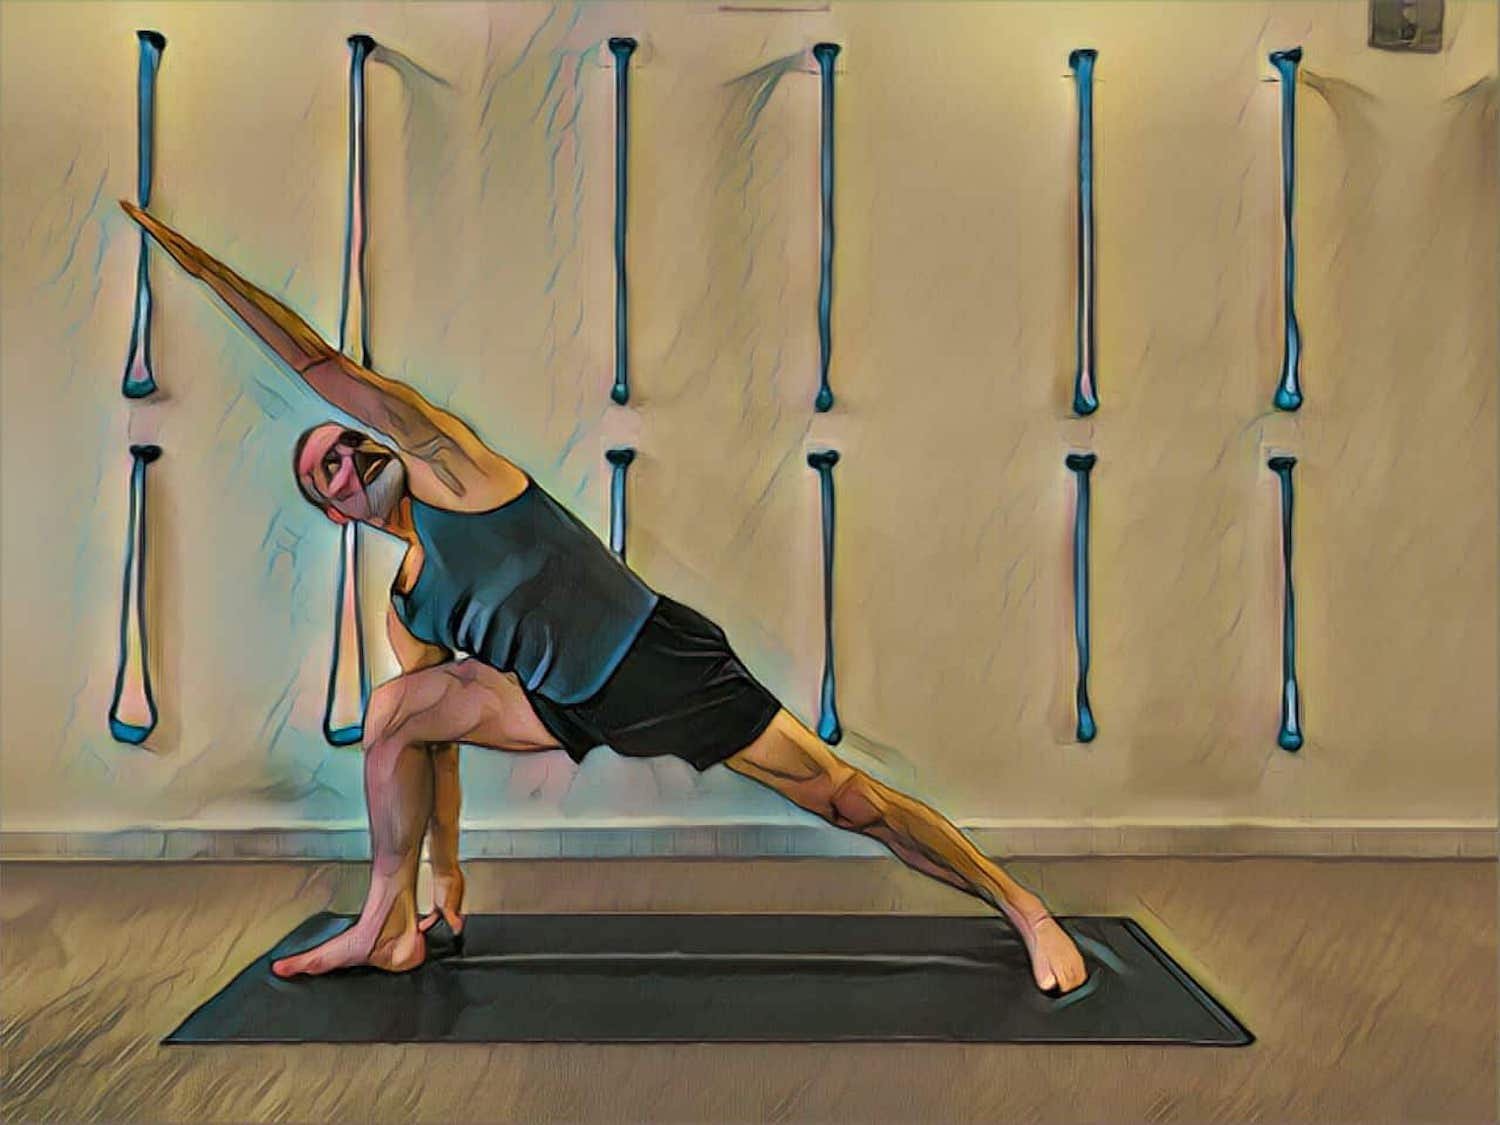
5. Parsvakonasana
Jump, or step, the legs apart. Turn to the right and do the pose. Come up. Turn to the left and do the pose. Come up. Jump, or step, back to tadasana. Spend 45 - 60 seconds on each side. Take the bottom arm to the inside of the front leg and use it from the shoulder to to work the bent knee back if tight in the hips and groins. Use a brick under the front arm hand if the back leg is dull in its extension.

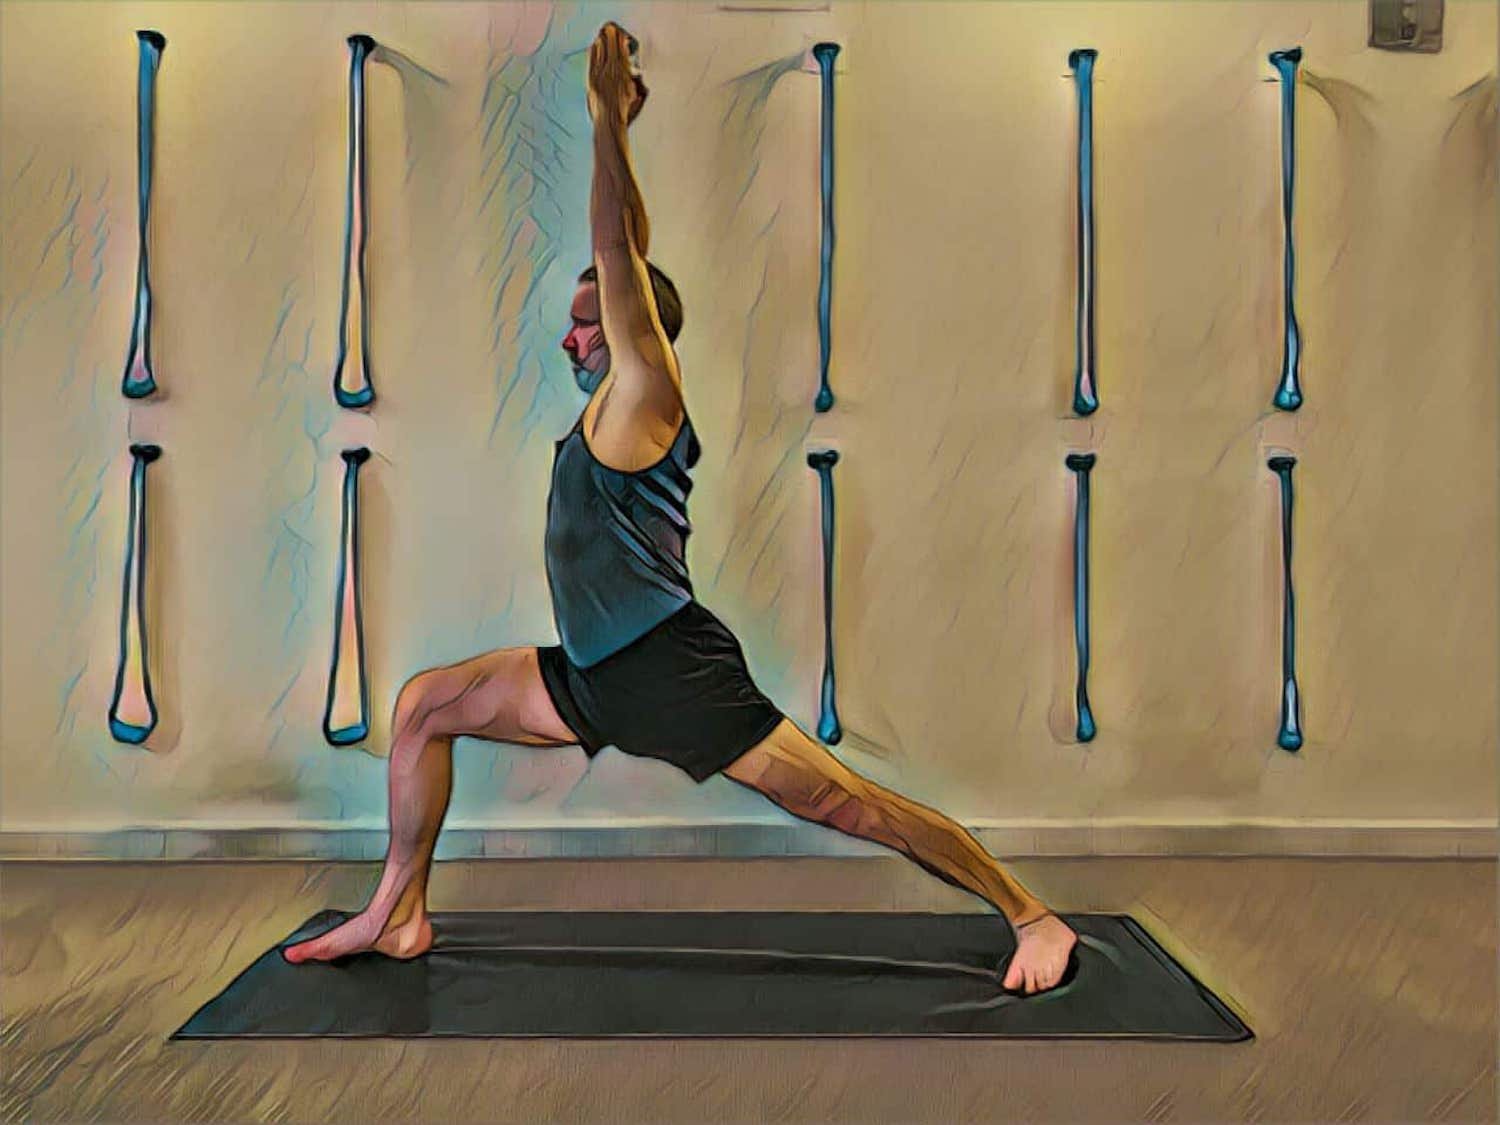
6. Virabhadrasana I
Jump, or step, the legs apart. Take arms up before turning to each side, or as an easier alternative, take hands on hips when turning to each side. Jump, or step, back to tadasana. Spend 30 - 45 seconds on each side.

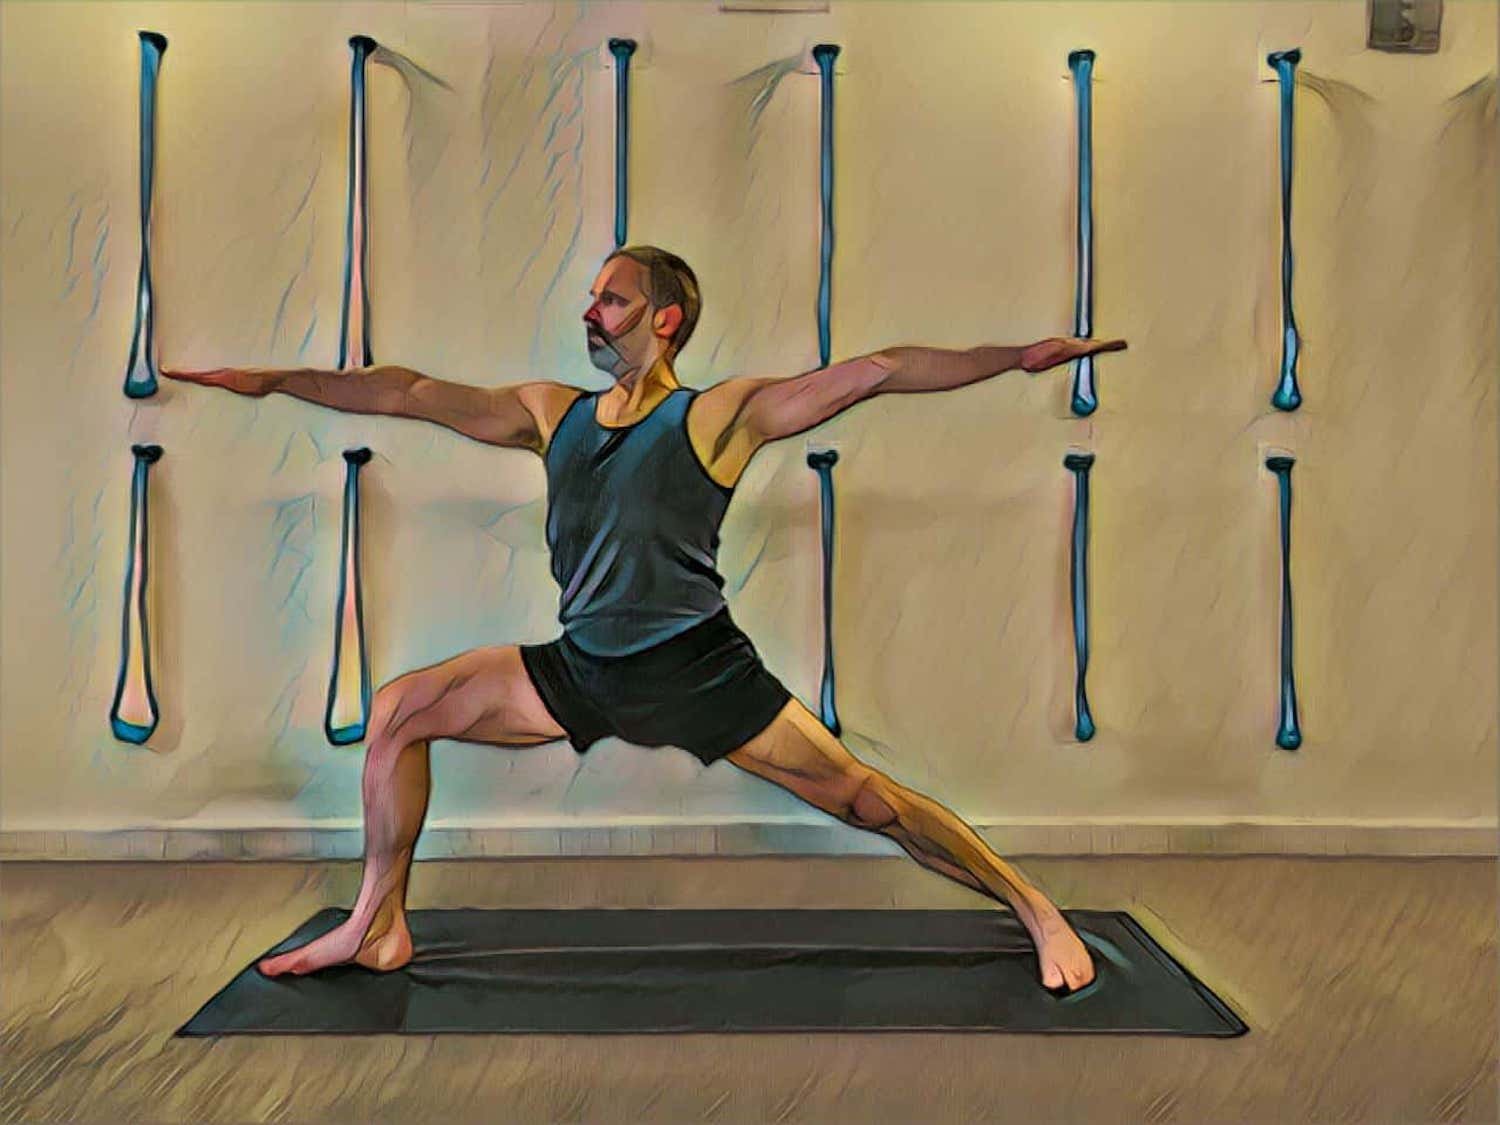
7. Virabhadrasana II
Jump, or step, the legs apart, with arms extended, before turning to each side. As an easier alternative, take hands on hips when turning to each side. Jump, or step, back to tadasana. Spend 30 - 45 seconds on each side.

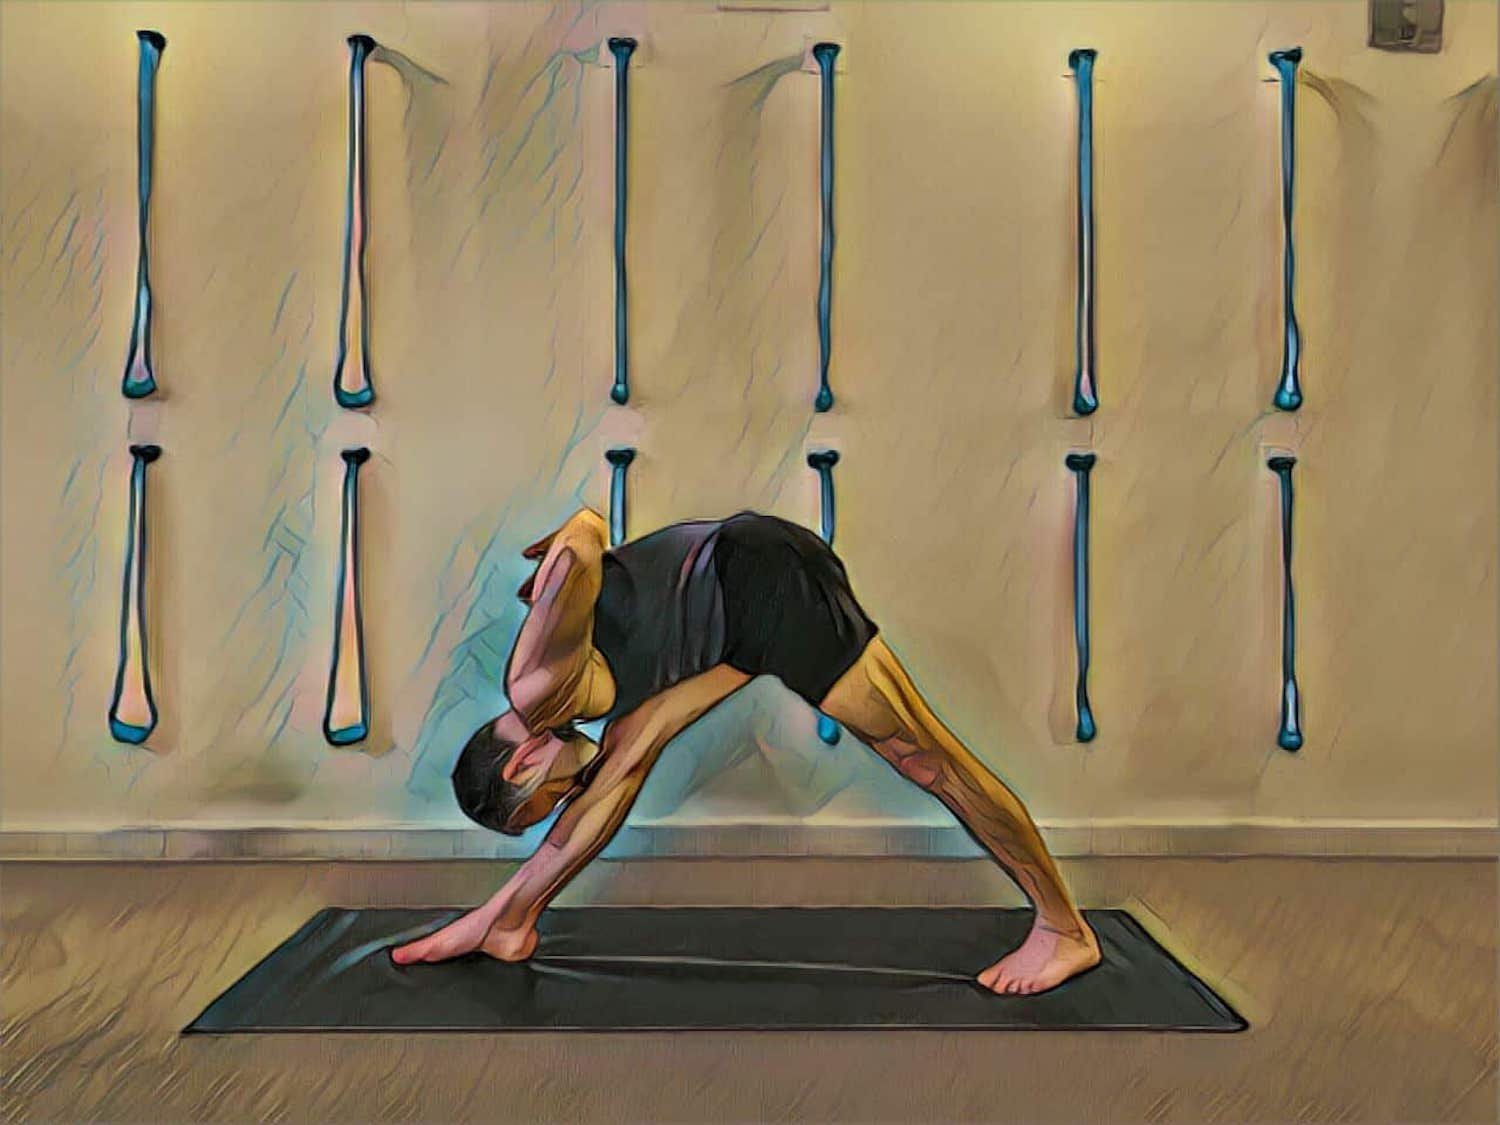
8. Parsvottanasana
From tadasana take the arms into paschinamaskar (or reverse prayer position). Jump, or step, the legs apart. Turn to the right and do the pose. Come up. Turn to the left and do the pose. Come up. Jump, or step, back to tadasana. Spend 45 - 60 seconds on each side. If paschinamaskar arms is not viable, do paschima baddha hasta (or arms bent behind catching the opposite arm above the elbow). As an easier alternative take the hands to the floor, or bricks, either side of the front leg foot.

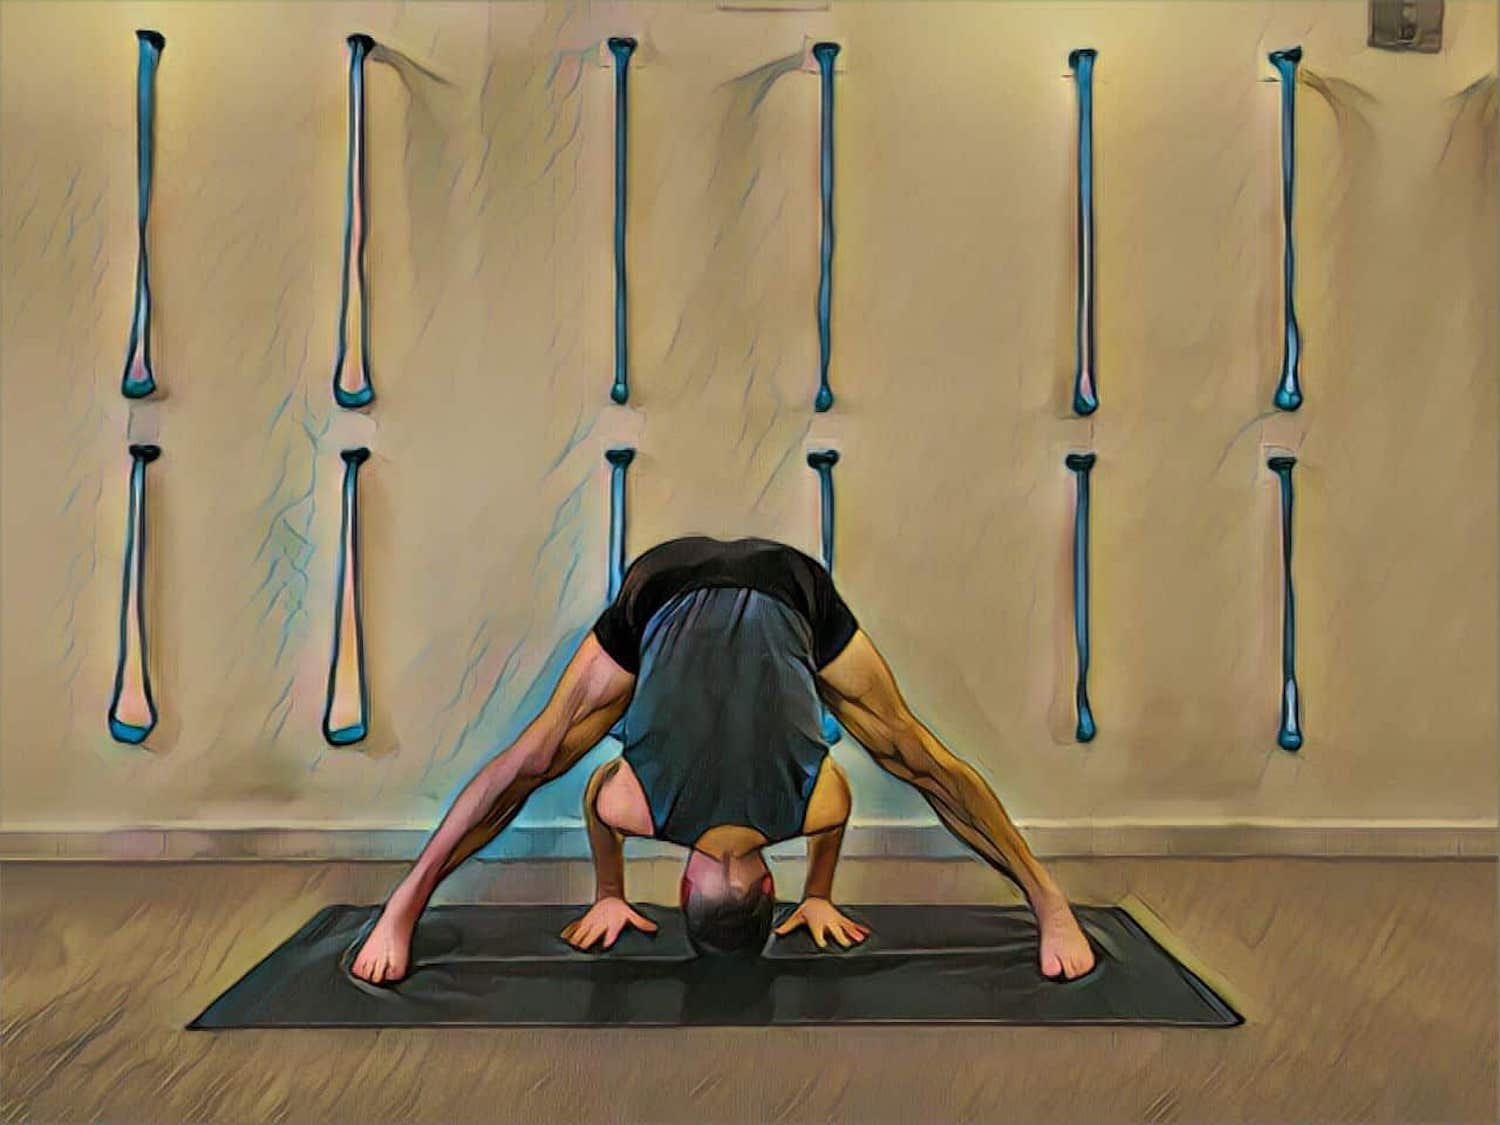
9. Prasarita Padottanasana
Jump or step the legs apart. Go into the pose, making sure to extend the spine once the hands are taken to the floor, before taking the head down. Come up. Jump, or step, back to tadasana. Spend 60 seconds or more in the pose.

10. Adho Mukha Vrksasana
Kick up with the support of a wall behind you. Press the palms and extend up through the legs. Hold for 45 seconds. Come down and rest. Repeat. Learn to alternate the leg you lead with when going up and coming down. If the full pose is not viable place the palms a leg length’s distance from the wall and walk up until the legs are parallel with the ceiling. Press the palms to keep the shoulders stacked vertically over the wrists, and lift up through the sides of the torso.

11. Pinca Mayurasana
Place the forearms on the floor with the elbows shoulder width. Kick up. Press the forearms and extend up through the legs. Hold for 45 seconds. Come down and rest. Repeat. Learn to alternate the leg you lead with when going up and coming down. Use a brick between the hands to keep the wrists apart, and a strap around the upper arms to keep the elbows in. If the full pose is not viable, keep the feet on the floor and walk in. Take the hips over the shoulders while pressing the forearms to keep the shoulders over the elbows.

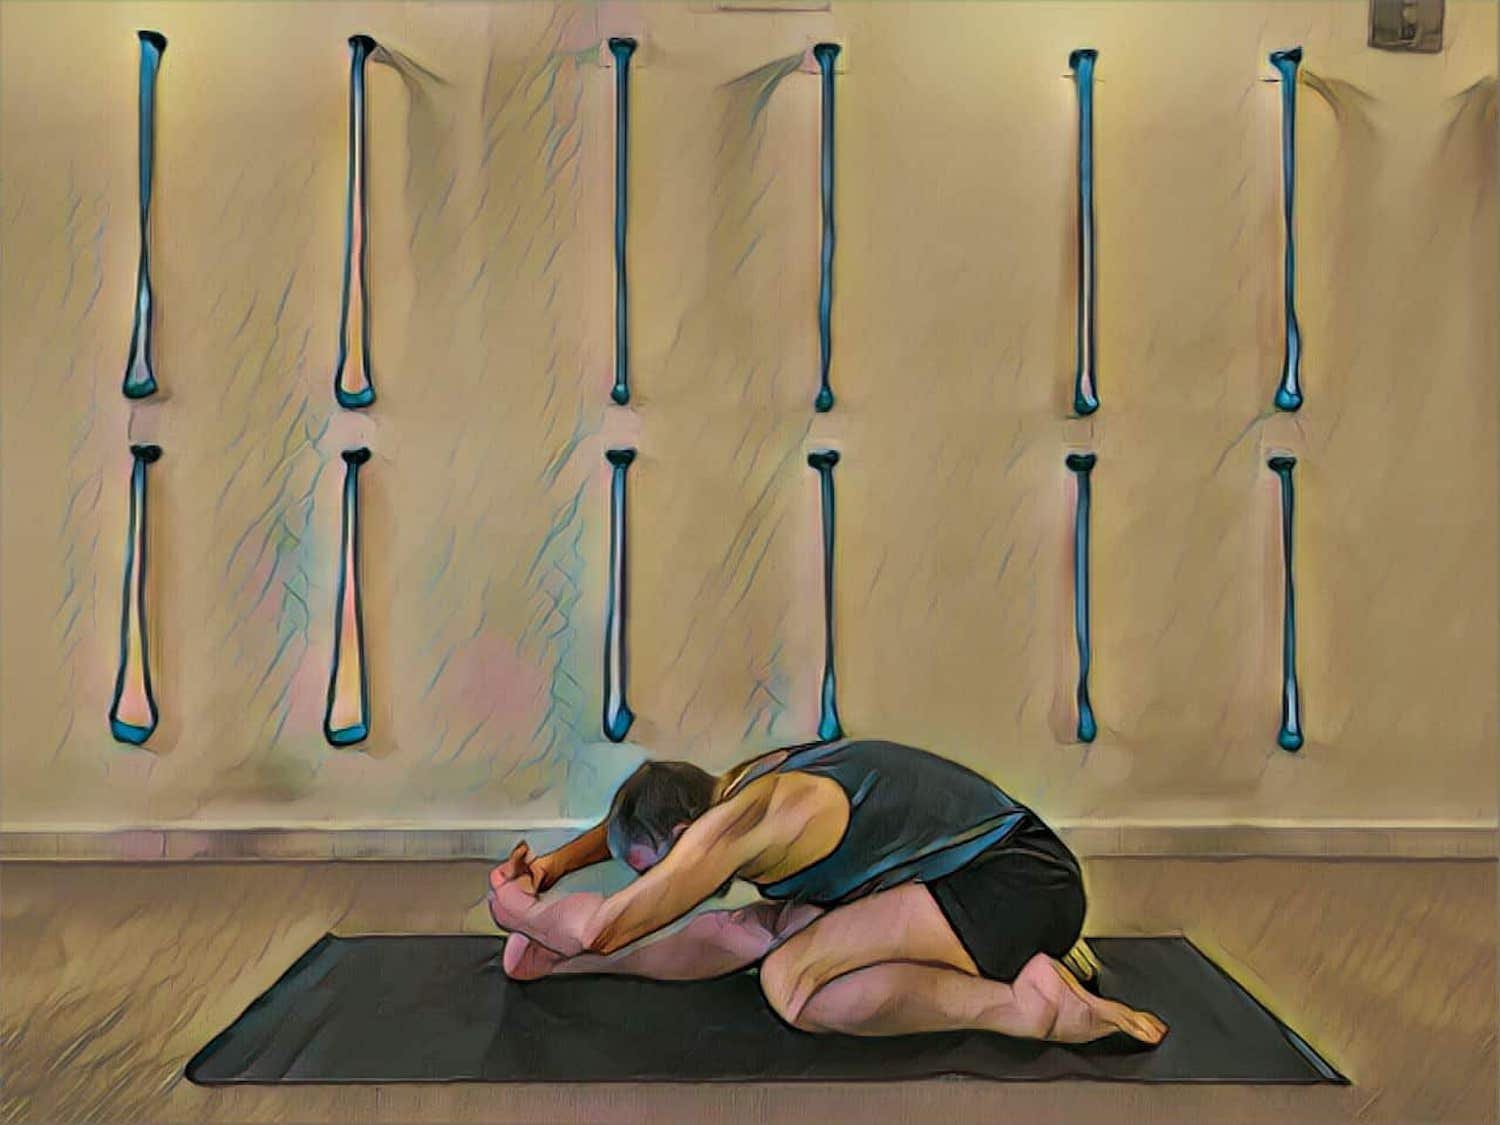
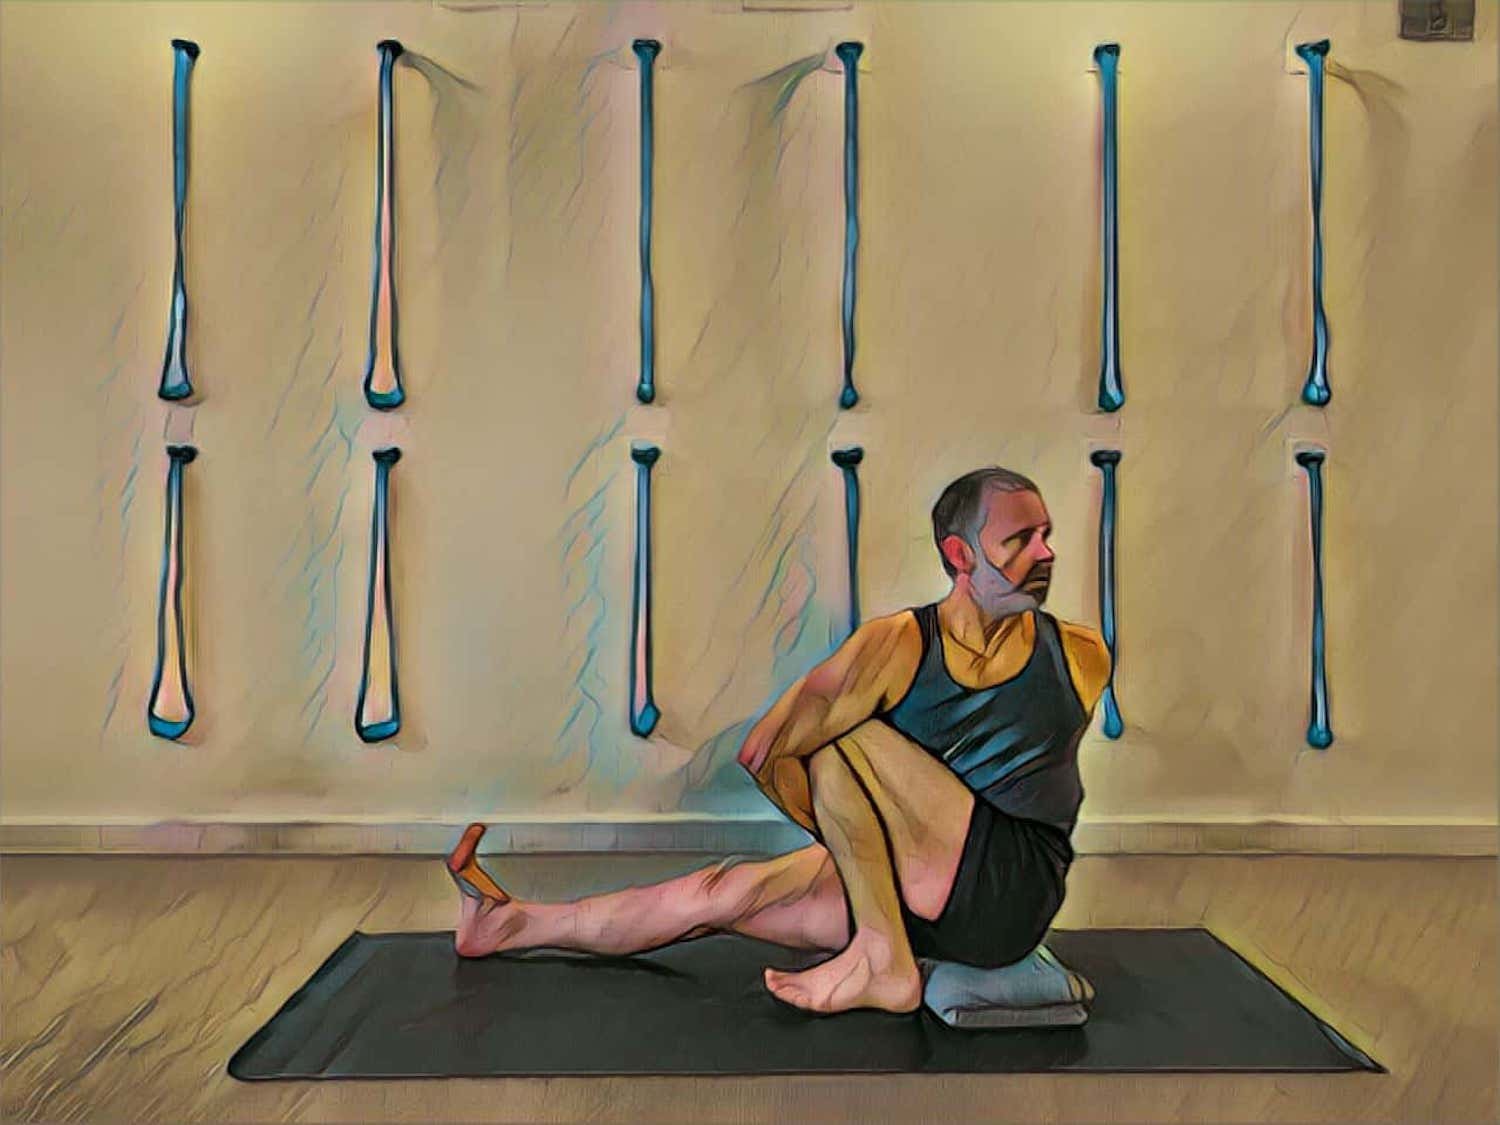
12. Triang Mukha Eka Pada Paschimottanasana
Start in dandasana (sitting on the floor with both legs extended straight). Bend the left leg into virasana keeping the right leg in dandasana. Raise the arms and extend forward, catching the foot. Lift up and maintain this for some time before extending forward along the thighs. Hoid for 1 - 2 minutes before coming up and changing sides. Return to dandasana between sides and after completing the second side. Make sure you support the straight leg buttock with a well folded blanket to prevent tilting to the straight leg side. Use a strap to connect to the foot if hamstrings are tight, and work more on the lift than the forward bend.

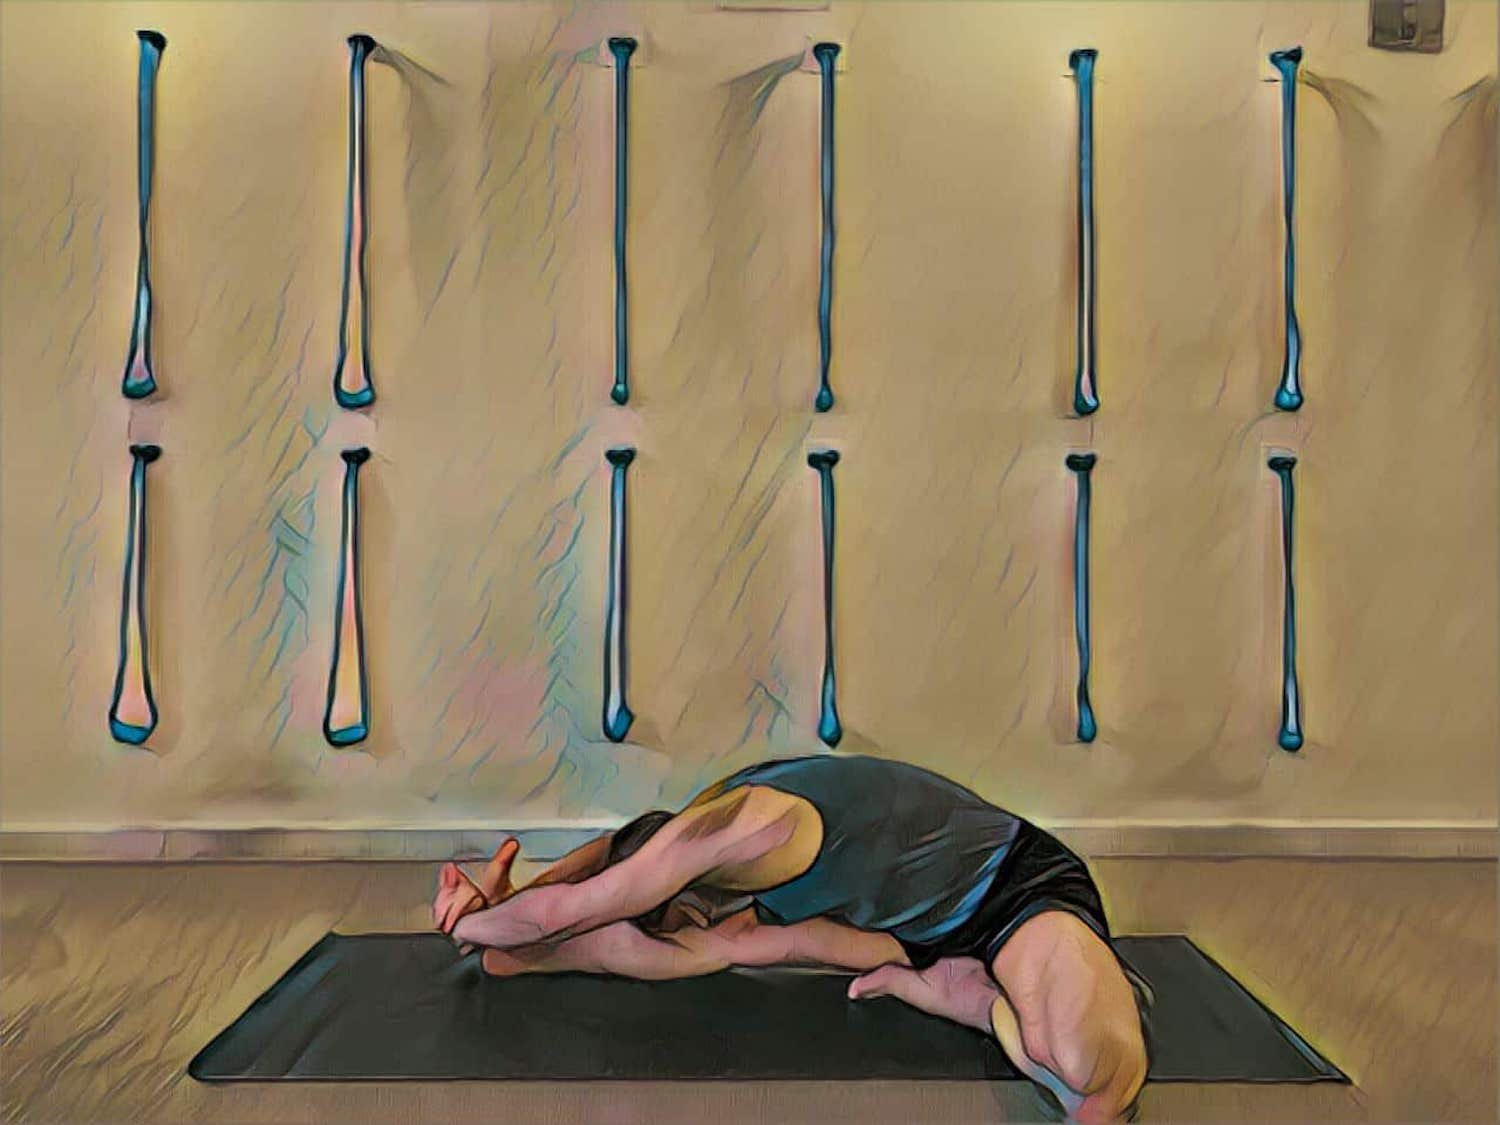
13. Janu Sirsasana
Start in dandasana. Bend the left leg out to the side. Raise the arms and extend forward, catching the foot. Lift up and maintain this for some time before extending forward along the right leg. Hoid for 1 - 2 minutes before coming up and changing sides. Return to dandasana between sides and after completing the second side. A folded blanket can be placed under both buttock bones to facilitate the lift of the torso out of the pelvis. Use a strap to connect to the foot if hamstrings are tight, and work more on the lift than the forward bend.

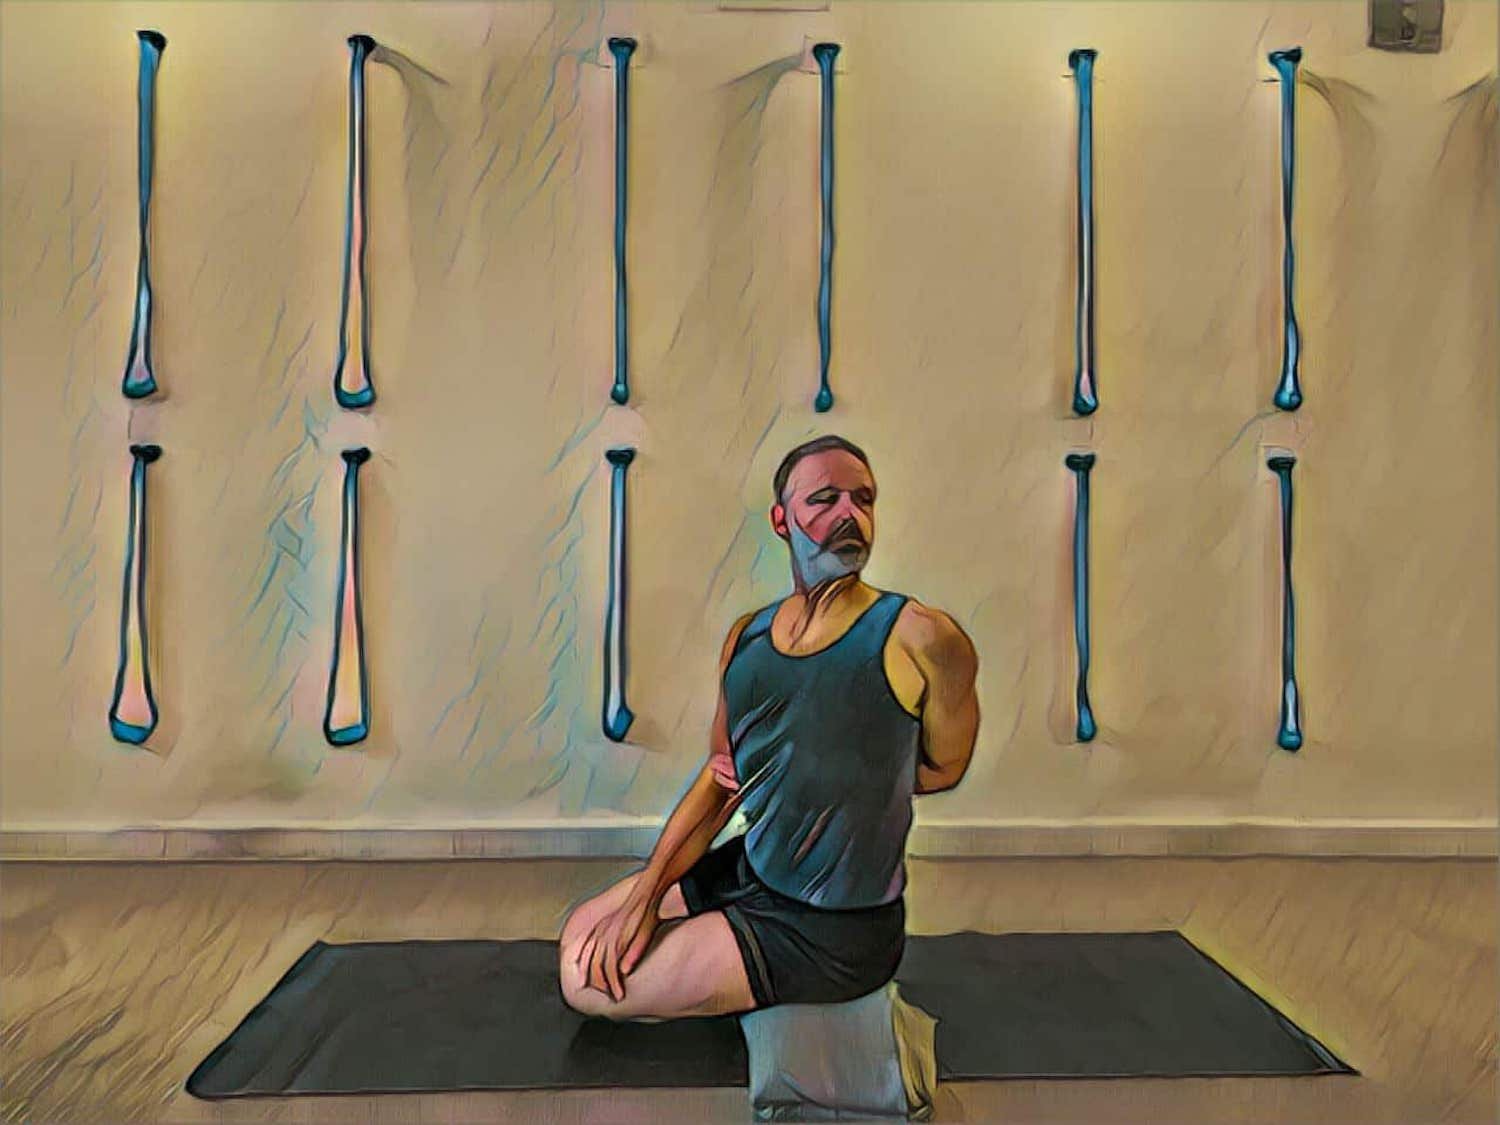
14. Bharadvajasana I
Start in dandasana. Sweep the feet to the right, crossing the right foot over the left. Swing the left arm behind to catch the right arm from behind. Take the right hand to the outside of the left thigh down toward the knee. Lift the chest and turn to the left, looking over the left shoulder. Stay in the pose for about 60 seconds. Return to dandasana between sides and after completing the second side. Place a folded blanket under the buttock of the side you are turning toward to prevent over tilting of the hips. A stronger twist can often be attained when the binding of the arms is not taken.

15. Marichyasana III
Start in dandasana. Bend the left leg into a marichyasana orientation. Swing the right arm across the left leg and use this leverage to turn the torso to the left. Rotate the arm around it so that you can take the left arm behind and bind. Lift the chest and turn more to the left. Stay in the pose for about 60 seconds. Return to dandasana between sides and after completing the second side. Place a folded blanket under the buttocks to enhance the torso lift. As in bhradvajasana I, often a better twist can be gained by not binding. Use the fingers of the arm you are turning towards to take the sacrum in and lift the spine. Use the other arm as a lever against the leg you are turning towards to generate the rotation.

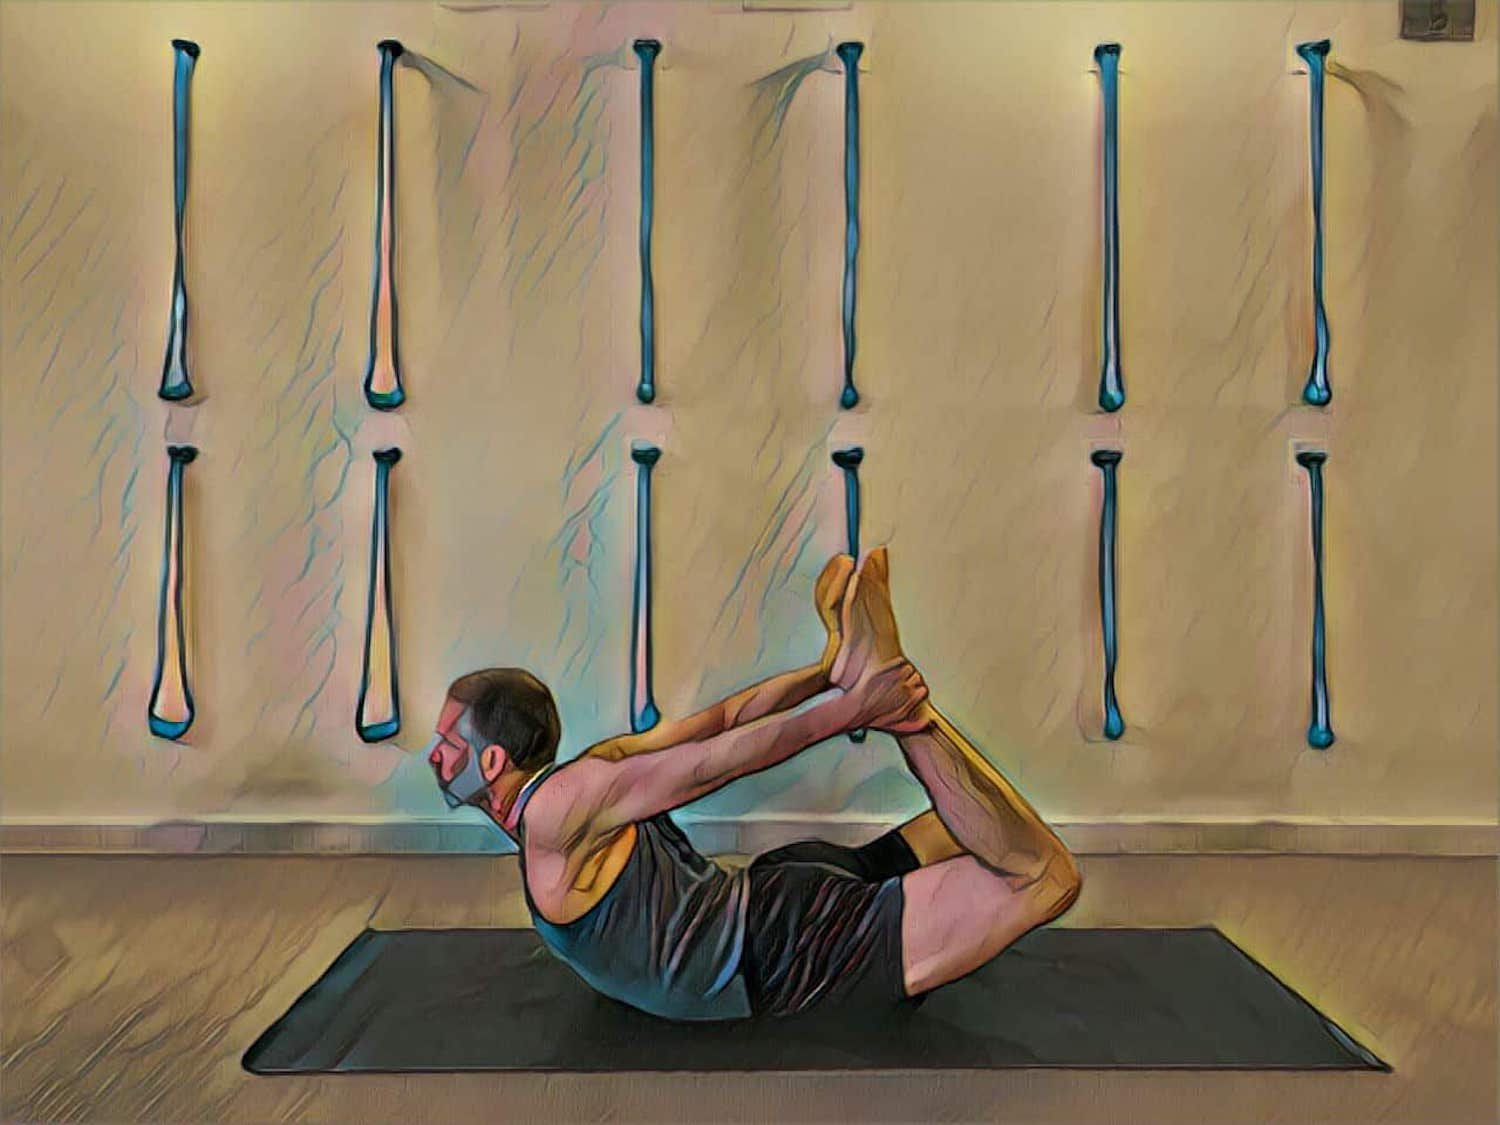
16. Dhanurasana
Start in a prone position. Bend the legs and catch the ankles from the outside of the legs. Press the sacrum down and lift the ankles. Draw the outer thighs in, roll the shoulders back and open the chest as you raise your gaze. Stay for 30 seconds. Release and rest in a prone position. Repeat.

17. Urdhva Mukha Svanasana
Start in a prone position. Place the hands beside the chest. Press the hands to lift the torso and draw the chest between straight arms as you extend back through the legs. Draw the shoulders over the wrists. Stay for 30 seconds. Release and rest in a prone position. Repeat. Place the hands on bricks or a rolled blanket to enhance the chest lift. Tuck the toes under and extend back through into the heels if lower back pain is acute.

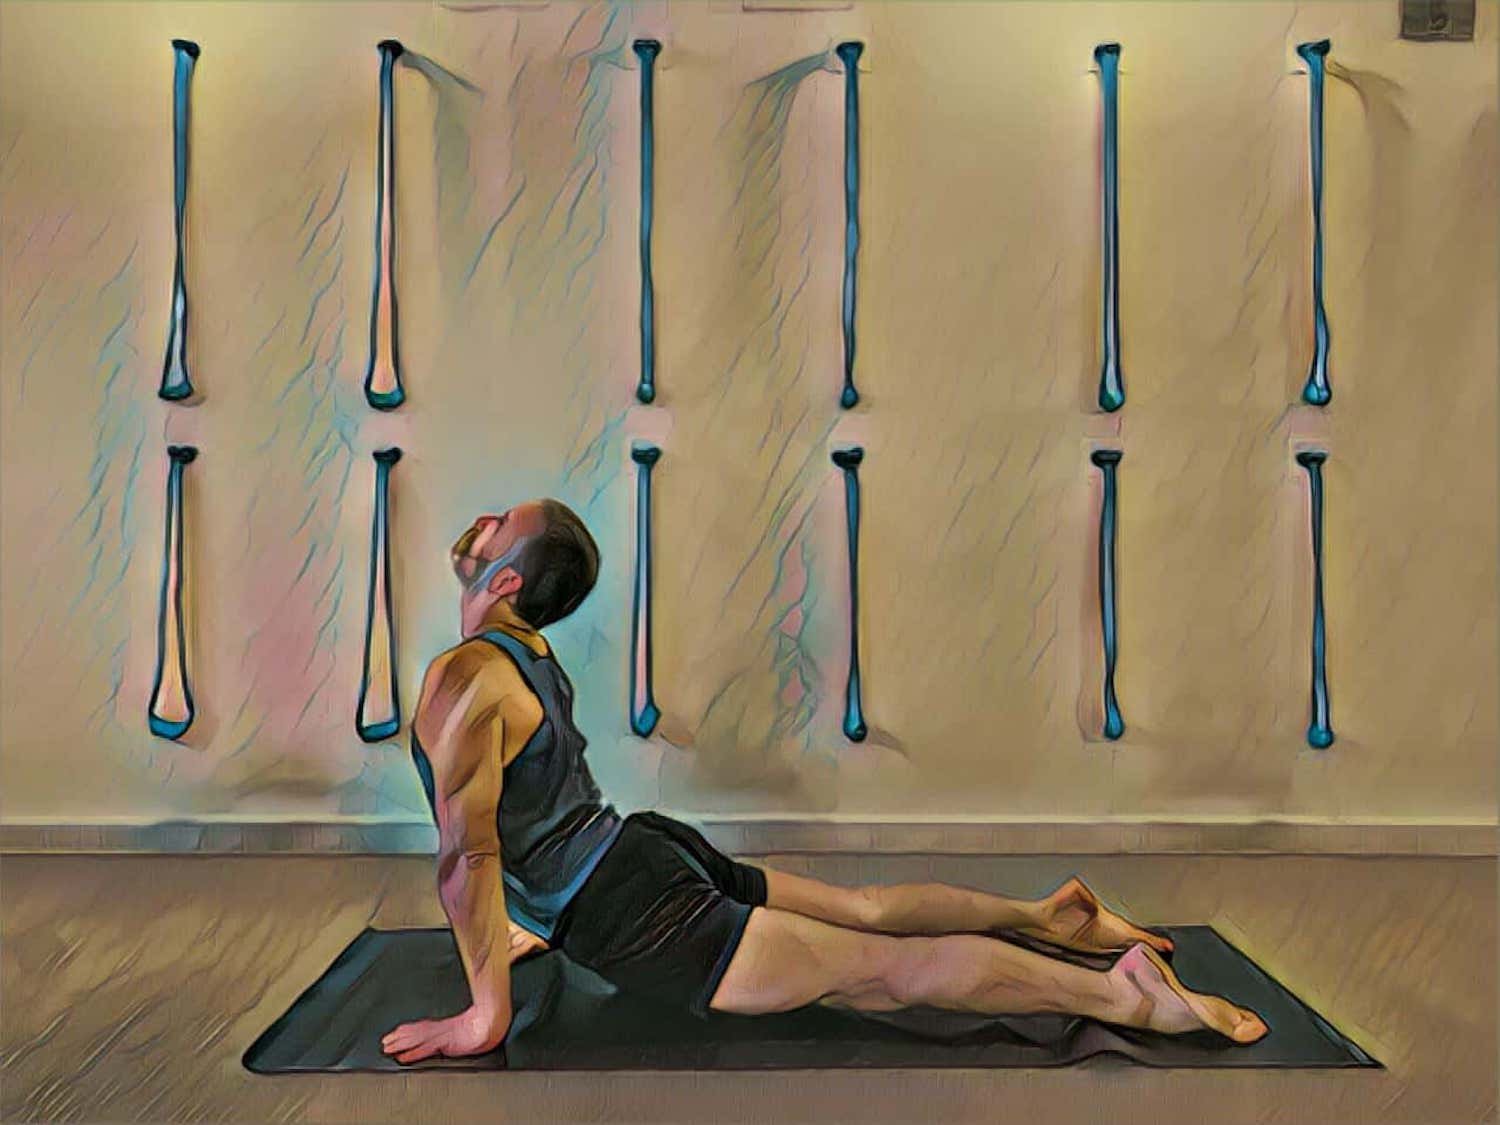
18. Ustrasana
Stand on your shins. With hands on hips arch back as you lift through your lumbar spine. Take the back ribs in to support the lift of the chest as you look back. Take the hands onto the heels and keep the shins pressing so the thighs remain vertical, hips over the knees. Stay for 30 - 45 seconds. Lead with the chest when you release to come up. Sit on the heels and rest. Repeat twice. Take the hands onto upright bricks either side of your ankles, or place a bolster across the heels if it is too much to reach the heels with the hips over the knees.

19. Supta Padangusthasana I
Lie on your back. Bend your right leg, raise your right foot, and clasp your shin with interlocked fingers. Draw the shin towards the thigh and squeeze the thigh towards your torso. Catch the right foot and extend the leg straight. As you work the thigh back to keep the leg straight draw the foot towards the head side. Stay for 1 - 2 minutes. Release the leg and repeat on the other side. Use a strap to connect the hands to the foot if required.

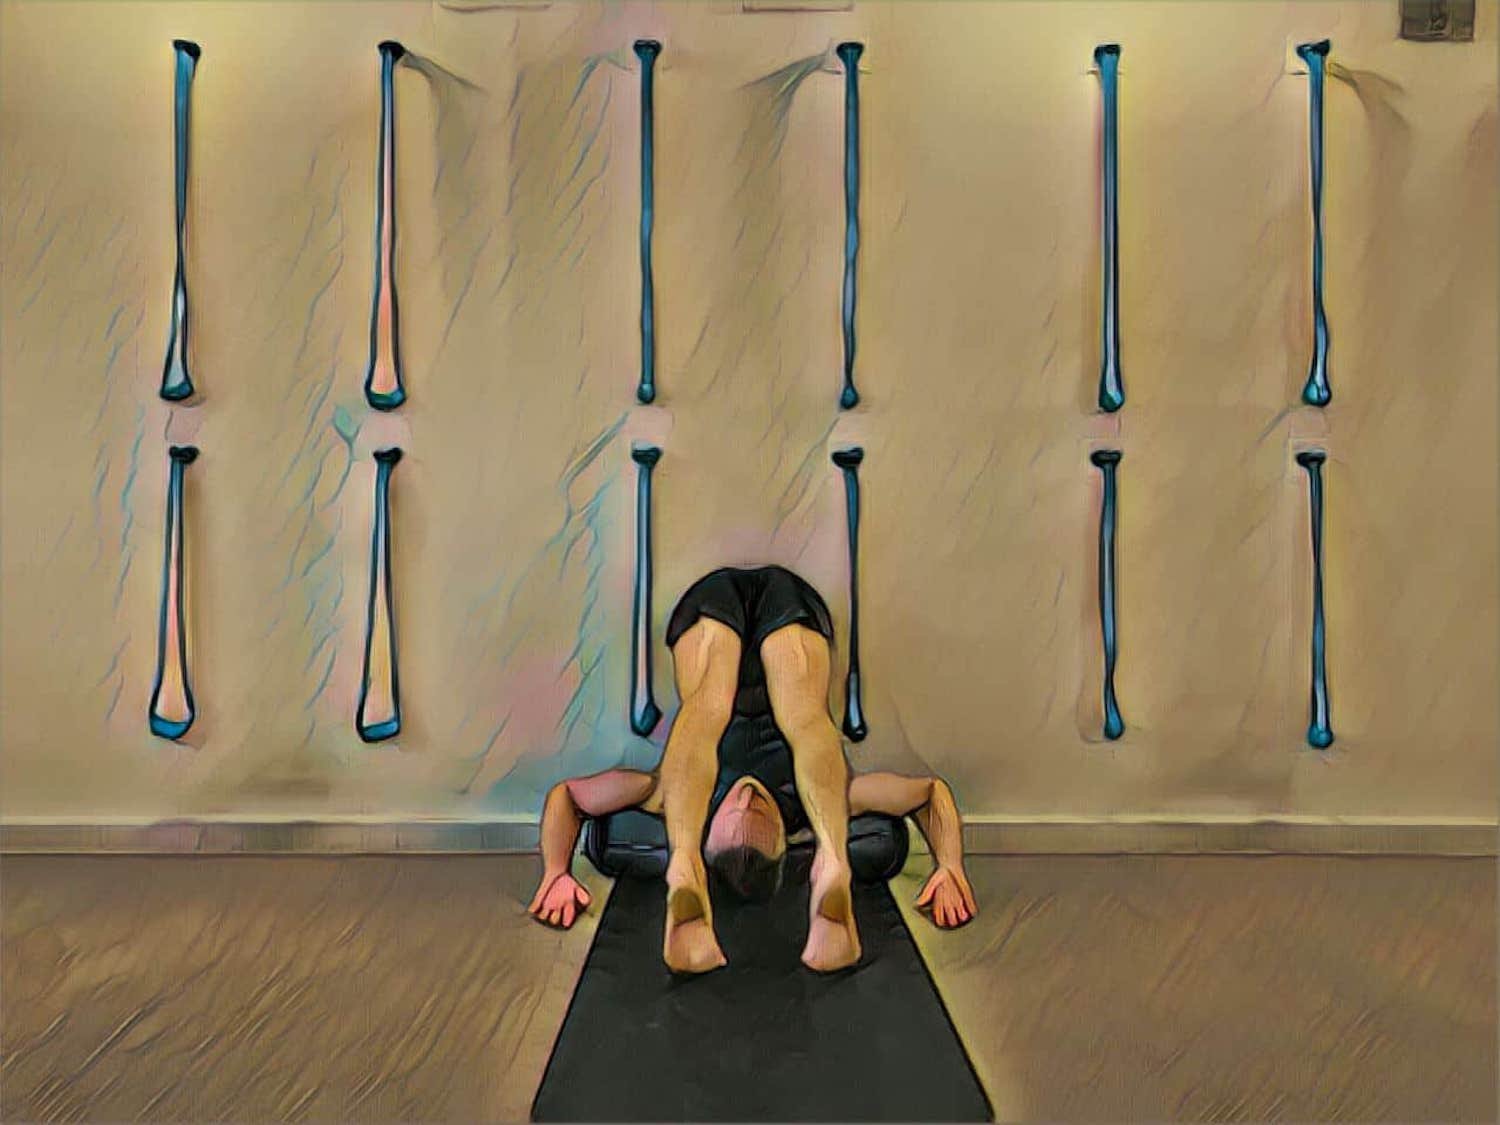
20. Halasana
Place a bolster lengthways into a wall. Place the crown of your head on the floor in front of the bolster with the back of the skull right up against it. With palms supporting either side of the head a little further away from the wall, raise the knees and roll onto the bolster so that the top of the shoulders are supported on the bolster and the back of the skull is on the floor. Rest the forearms on the bolster with the arms bent at a right angle. Space the feet hip width and slightly suck the heads of the thighs into the hip sockets. Stay for 5 minutes before rolling into the next pose. Do this pose in the traditional manner with feet against the wall or toes tucked under on the seat of a chair if required and the necessary props are available.

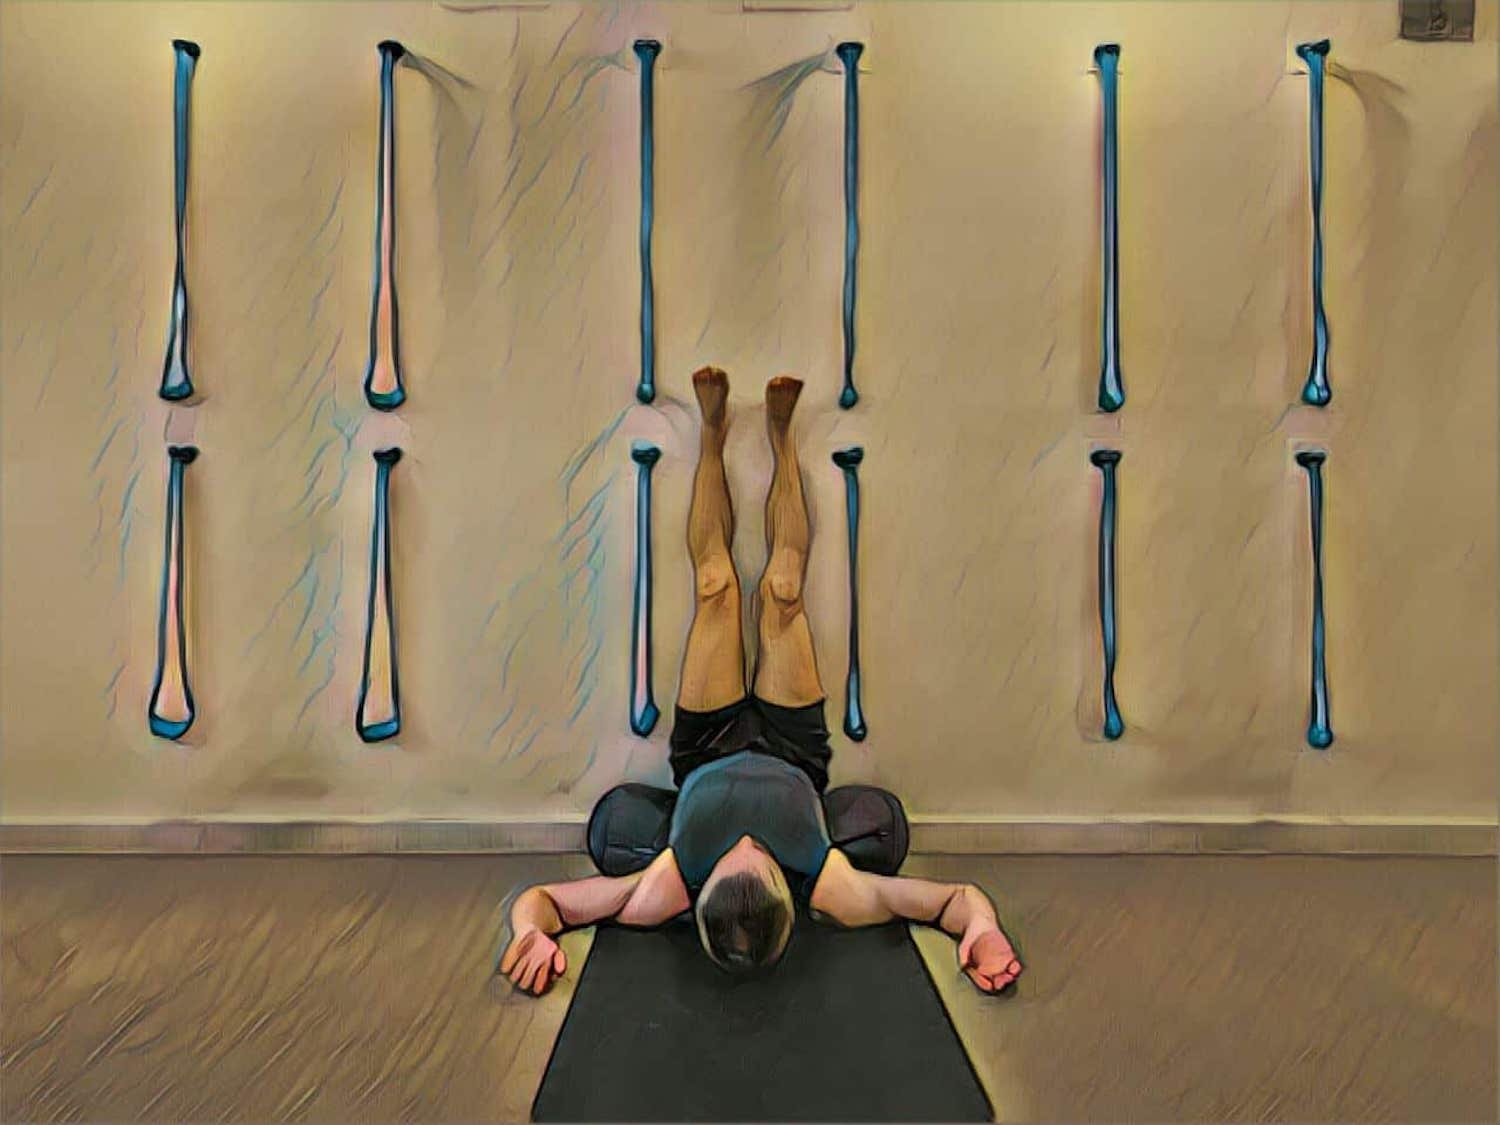
21. Viparita Karani
From halasana roll into viparita karani. Keep the buttocks flush to the wall but create a small gap between the bolster and the wall for the buttocks to slightly dip into. Stay, with legs slightly separated, for 3 minutes with eyes closed. Then slowly bend both legs simultaneously and roll over to the right side.

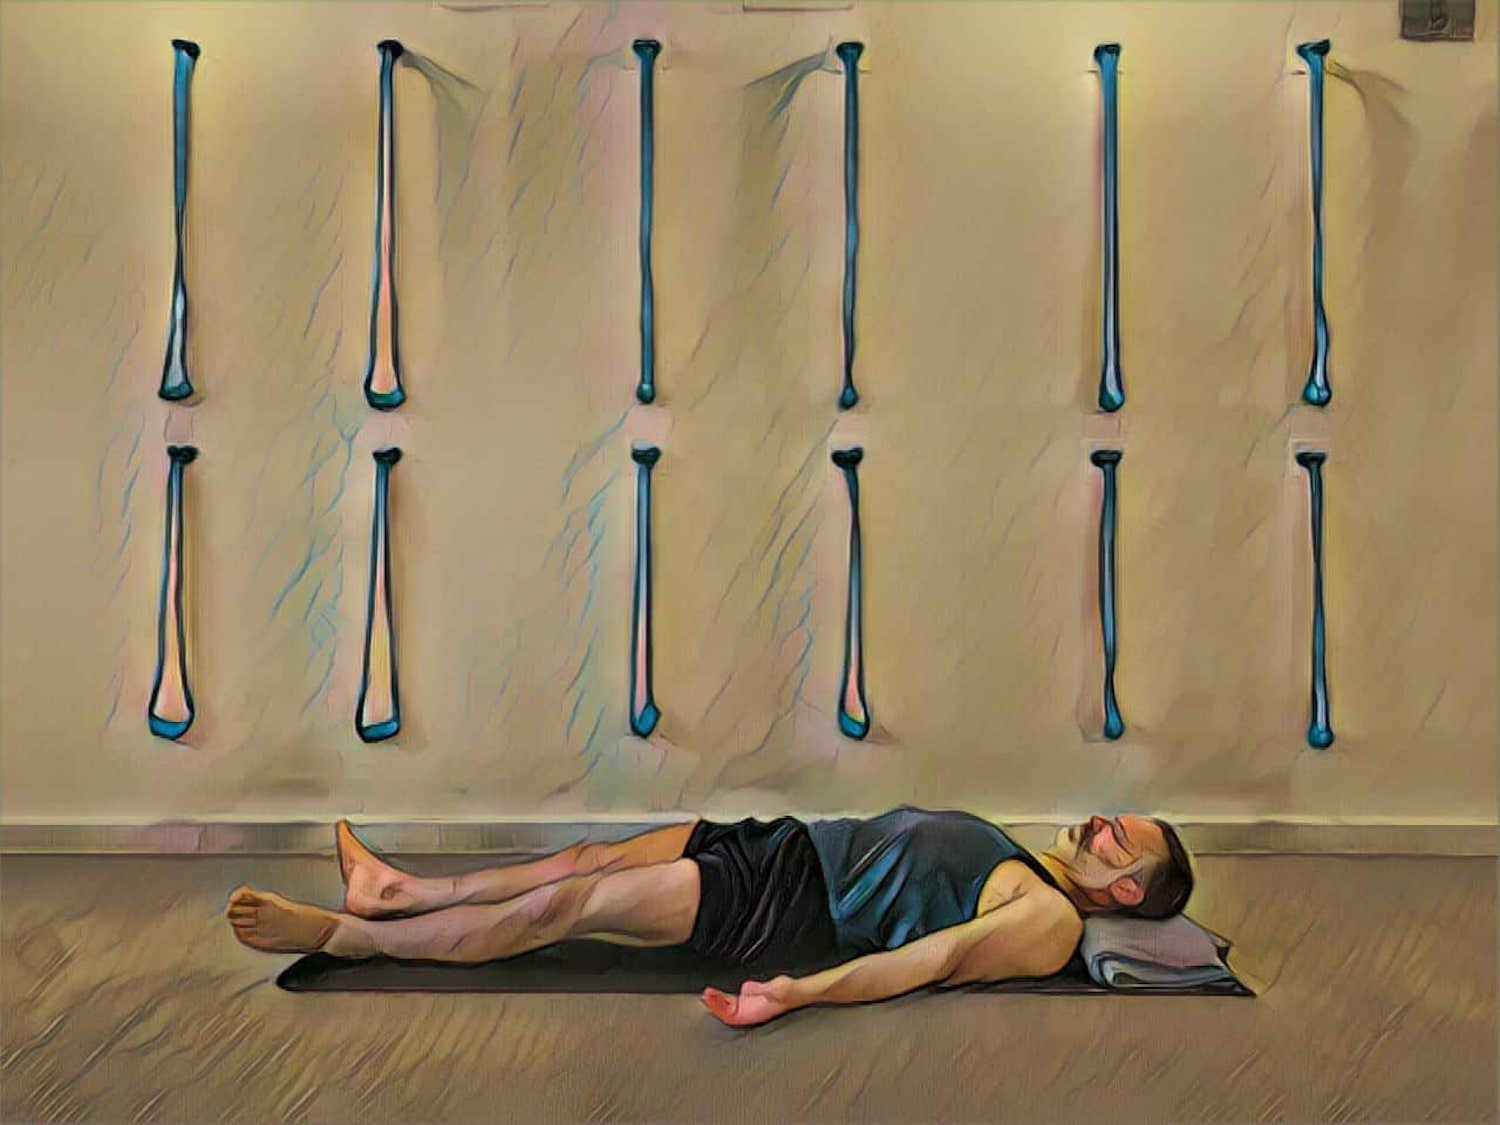
22. Savasana
Lie out on your mat with a folded blanket supporting the back of the skull. Align yourself with your mat and make sure the legs and arms are evenly spaced. Close the eyes, draw inwards, and savour the effects of your practice. Stay for at least 5 minutes.
Self-practice starts with regular class attendance, in-person or online.

James Hasemer
James Hasemer is the Founder and Director of Central Yoga School and a Senior Iyengar Yoga Teacher, Assessor, and Moderator. He is also currently a Teacher Director on the Iyengar Yoga Australia Board.
References
Light On The Yoga BKS Iyengar